My inky travels along life's rocky road

Thursday 31 December 2020

A Card in a Box

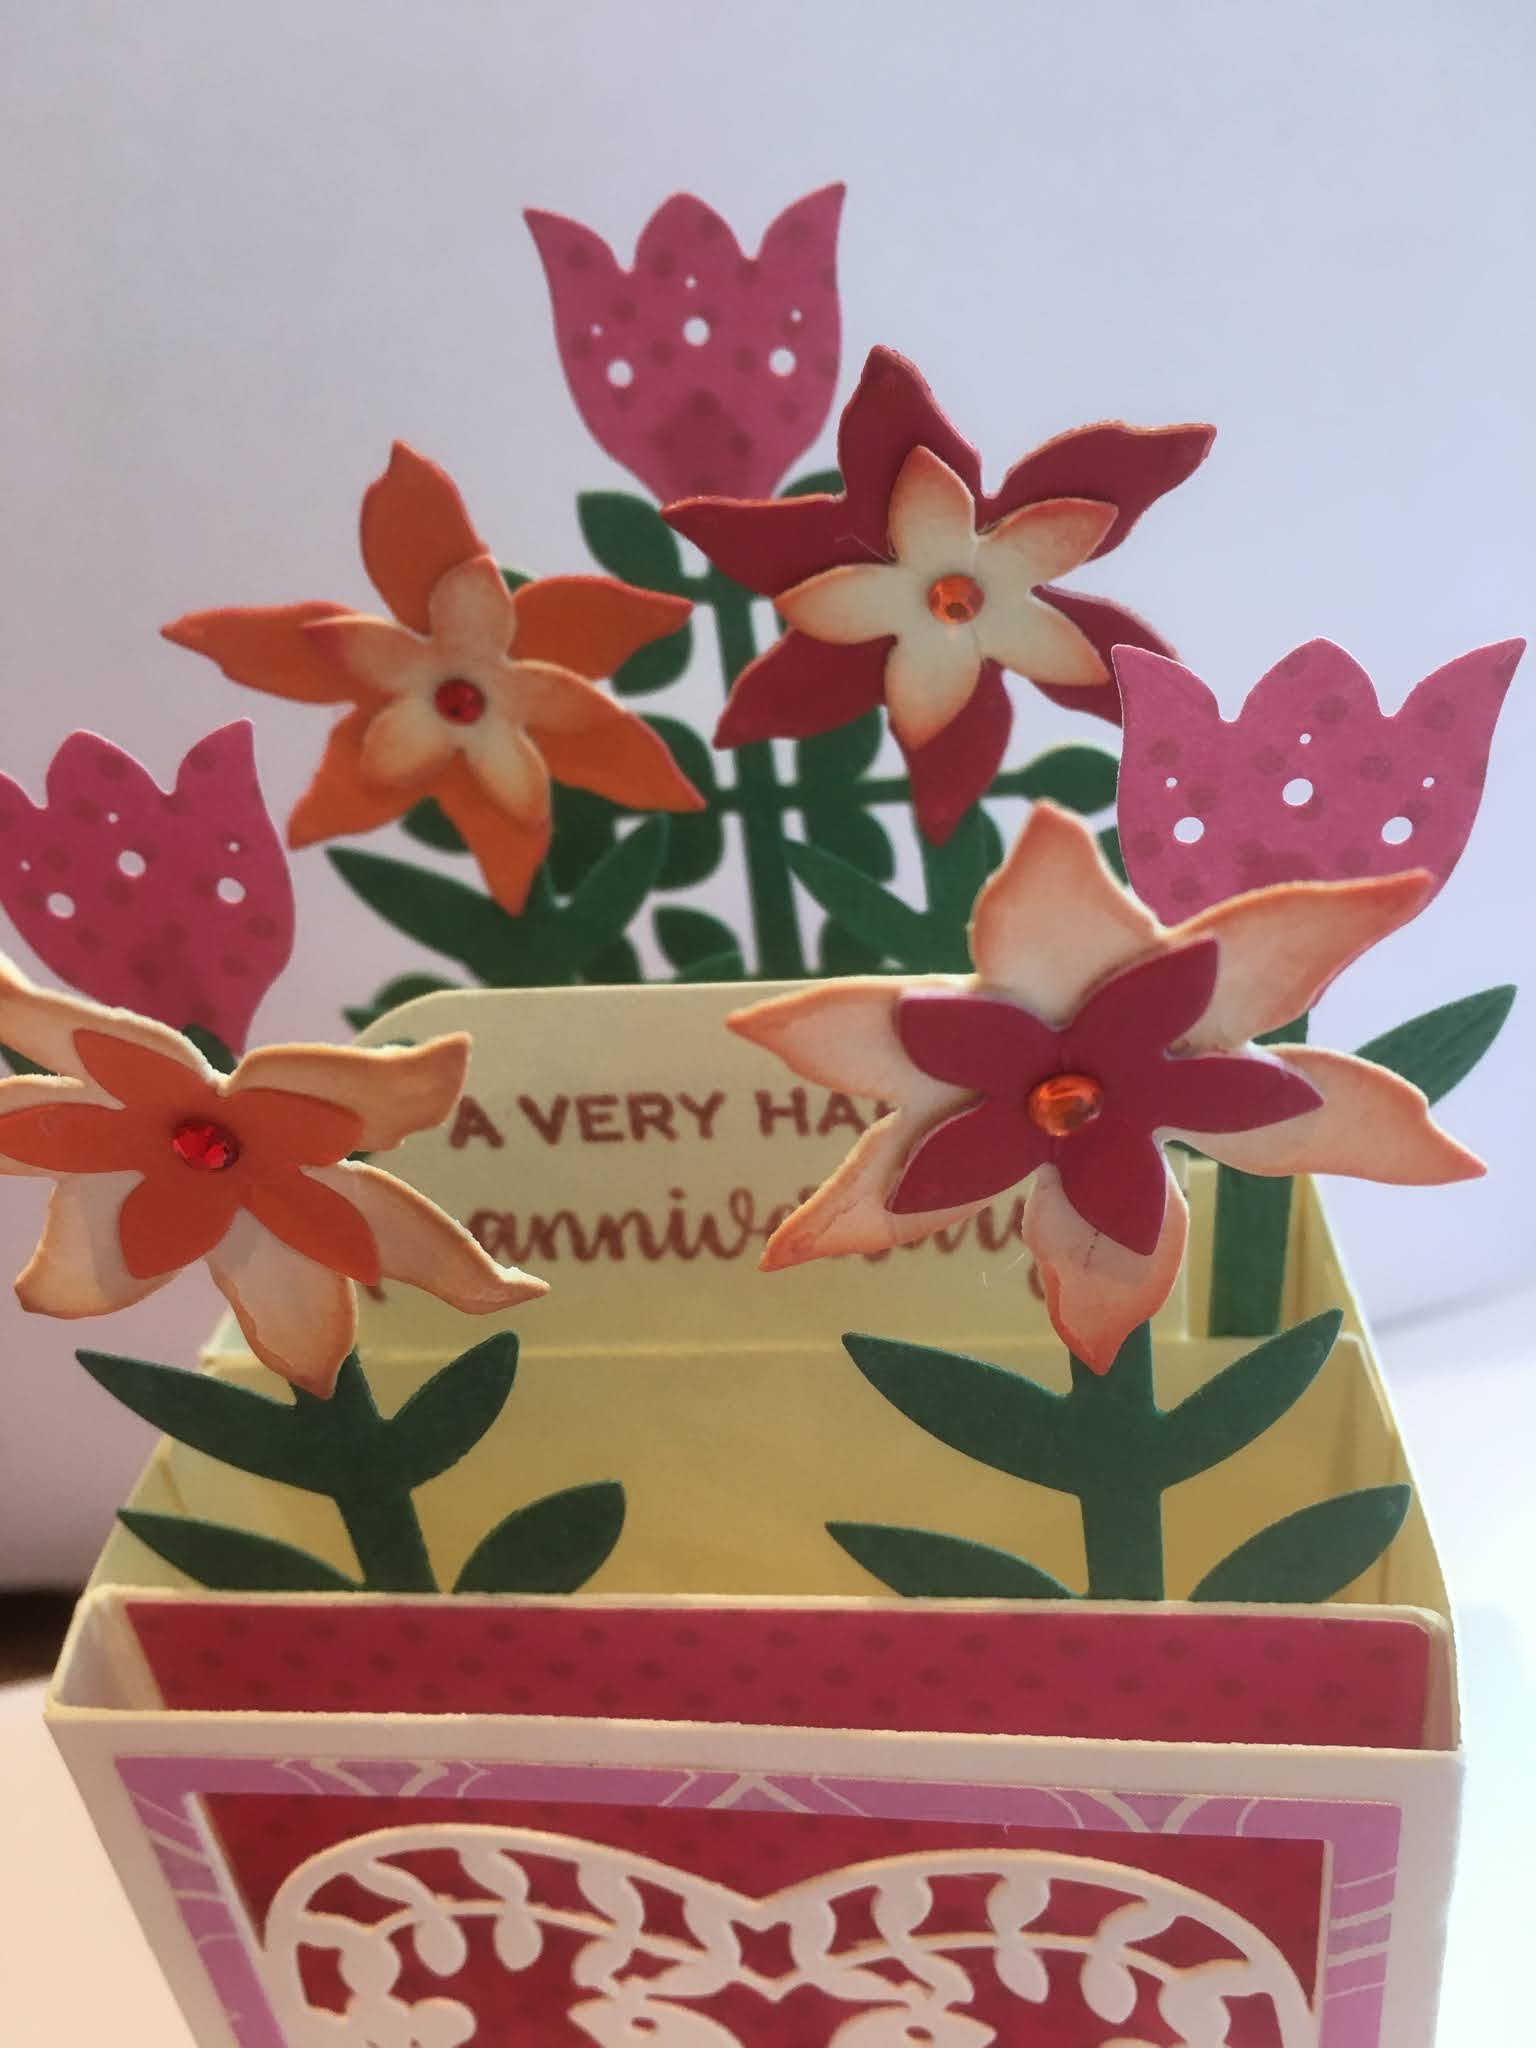
 I was lucky to place an order in Sizzix's recent pre-Christmas sale. I managed to order 6 items - there were others I wanted but the website was playing up and kept doubling up my order and was taking ages to load anything. I was very surprised but delighted when my order arrived just a few days later before Christmas. I didn't realise that the 80% sale would only be on for a short time so when I looked at the website again I found that most of the items I'd ordered were out of stock and the ones still in stock were at a higher price albeit still reduced.The Christmas Card in a Box #663603 is an example - I got it for £4 but it's now reduced to £10. Receiving it earlier than expected I was able to play with it on Boxing Day to make this anniversary card for my husband.

There are no instructions with it and the online video is very short so it took me a while to figure out how to put this together. Although it's called a Christmas box the majority of elements can be used for any occasion - the ones I didn't use were the snowflake and the deer. There are still bits I don't understand like why the main structure of the box has scorelines which I didn't need and why the inserts have small notches on them but I'm very pleased with how this has turned out. I used some heavy-duty cream hammered card for the box and some patterned paper to decorate. The flowers were all cut from scraps and offcuts. I added a small sentiment banner stamped with a Bright Rosa set.


It even folds down (sort of) to fit in an envelope!


Thursday 24 December 2020

 I received this from family in Canada and wanted to share it with you. I don't know who wrote it but it sums up the year for me:

��Christmas is not cancelled!��

T'was a week before Christmas, and all through the town,

People wore masks, that covered their frown.

The frown had begun way back in the Spring

When a global pandemic changed everything.

They called it corona, but unlike the beer,

It didn’t bring good times,it didn’t bring cheer.

Airplanes were grounded, travel was banned.

Borders were closed across air, sea and land.

As the world entered lockdown to flatten the curve,

The economy halted and folks lost their nerve.

From March to July we rode the first wave,

People stayed home, they tried to behave.

When summer emerged the lockdown was lifted.

But away from caution many folks drifted.

Now it’s December and cases are spiking,

Wave two has arrived, much to our disliking.

It’s true that this year has had sadness a plenty,

We’ll never forget the year 2020.

And just ‘round the corner - the holiday season,

But why be merry? Is there even one reason?

To decorate the house and put up the tree,

Who will see it no one but me.

But outside my window the rain gently falls,

And I think to myself let’s deck the halls!

So, I gather the ribbon the garland and bows,

As I play those old carols my happiness grows.

Christmas is not cancelled and neither is hope.

If we lean on each other, I know we can cope .


Wishing everyone a Happy, Peaceful and Safe Christmas


Wednesday 23 December 2020

A Little Celebration


Although I'm not in a very celebratory mood at the moment I'm sure the time will come when this card will be just right. I recently ordered some pearl and silver alcohol ink mixatives (I already have gold) from Countryview Crafts and wanted to try them out. I used my plastic file divider sheets that I've written about previously. I think they're like Yupo paper although I've never seen Yupo IRL but these seem to do the same job. I used slate, eggplant and various blues - stonewashed, sailboat blue, cloudy blue along with both mixatives. I can't really see the effect of the pearl and the silver is quite opaque so I will have to watch a demo and see if I was doing anything wrong. However I was pleased with the result and used some on this card. The base is Bazzill Gemstone cardstock in a faded denim. I matted the inked piece with white card and diecut some flowers from a recent eBay (or it may have been Amazon) purchase. The sentiment is from a Dovecraft set of useful sentiments stamped with Versafine majestic blue.

Wednesday 16 December 2020

Monthly Challenge - December


This month the letter is:    

                       C for Christmas

I completely forgot about the colour options which are Crimson, Cobalt and Copper.

It took a while for this to come together but I'm pleased at the way it did. I thought long and hard about what I wanted to depict on the theme of Christmas - I have lots of Christmas tree, bauble, holly and present stamps but I didn't want to use any of them. Then I remembered a nativity die set that was a freebie with a magazine and I found a Hobbycraft stamp set of the 3 Kings. The background was made with blended stormy sky, blueprint sketch and dusty concord DIs. I then splattered some silver acrylic paint for a starry sky.The nativity set included the shepherd, star and palm trees (there was also a camel but I didn't need that). I die cut all the parts I needed from black paper and the star from glitter card. I stamped the 3 Kings with my stamping platform and Versafine onyx black. The hills are from a Sizzix build a landscape set, I highlighted the curves with a Wink of Stella pen. The sentiment is a stamp I had made a long time ago.


Saturday 12 December 2020

Inlaid Butterfly Die Cut


 I was flicking through the channels on TV the other day whilst exercising when I caught the end of a demo on one of the craft channels. The technique created an inlaid shape in a die cut aperture. It looked interesting so I thought I would give it a go. I used the partial die cutting technique and a circle die to cut an incomplete circle. I then used a butterfly die over part of the uncut bit of the circle and then stamped over it with the matching stamp.The butterfly is actually part of the card base and the circle is a partial aperture. It's a lot easier to do than describe! After the butterfly die has been cut it just needs a couple of  snips to release the negative from the circle revealing the butterfly wings. It's a useful technique that can be used with any shaped aperture and any other die with a strong outline but it helps if the latter has a matching stamp. In this instance I used a Dare 2 B Artzy stamp and die set.  I cut this on an A6 sized card, covered the back with foam tape and added some patterned paper (DCWV Tie Dye Stack).That was added to a white card blank. The sentiment is from an old sticker set and the corners were another sticker set.I heat embossed the butterfly, coloured it with Tri-blend alcohol markers and added some gems.


Wednesday 9 December 2020

Circle Fold Flower


 I saw this tutorial a while ago on the Craft World forum and decided to give it a go. I punched out some circles in patterned paper and folded according to the instructions. Once you get the hang of it they come together very quickly and it's a fun thing to do while listening to a podcast or watching TV. I punched another circle from scrap card and used that as a base to stick the patterned pieces on. Then it was a matter of matting and layering and adding a gem and a diecut sentiment. I think double -sided patterned paper would be a better option but I decided to practice on some old paper that I was that enamoured with. You can find it the instructions here

Monday 7 December 2020

A Happy Card


 I bought this Visible Image stamp from Country View Crafts last week. Every year in December Country View have an advent calendar which opens to reveal a different set of offers every day - it might be Sizzix dies or Crafter's Companion, or Visible Image or a selection all at discounted rates. Postage is free in the UK if you spend £7.50 (not hard with so many tempting offers). Of course I had to use it as soon as it arrived so I made this quick card. The background is DOs - fossilized amber, spiced marmalade, crackling campfire (another advent calendar purchase) and candied apple - blended through a pebble stencil. I stamped the sentiment in Versafine onyx black and cut it into a banner shape. A candi dot finished it off.

Saturday 28 November 2020

Festive Wreath


Back to festive crafting and I thought I'd use my wreath builder template because if you can't make a wreath in the run-up to Christmas when can you? I discovered some leaf frond type clear stamps that were from an old set I remember buying in Lakeland in the good old days when they sold craft products. I'd used some of the floral stamps in the set but I had never used these small wispy leaves before. I used 3 different stamps and Impress Emerald, Spring Green and Versafine spanish moss inks. I wanted some berries and whilst I could have gone for some red Stickles I used a sprinkles stamp from a build-a-cupcake set. The star gems were added to hide an ink blot. I used a circle die to cut out the centre and mounted it onto a 10.5cm square card blank. The sentiment by Paula Pascual is stamped on the card blank in Impress poppy red. I think next time I will position the fronds so that some of them stick out a little to fill the space a little better but on the whole I'm pleased with the result.

Wednesday 25 November 2020

Monthly Challenge - November


 As a break from all things Christmas I finally completed my entry for the monthly alphabet challenge. The letter this month is : 

                                                                 K for Kiss

Colour options are Kelly Green and Khaki both of which are in this somewhere.

My original plan was more human-based and romantic but then I found this old frog/toad on a leaf stamp that I think I got years ago in a grab bag. Given the colour options this month a frog sounded like the perfect image and then I remembered this quote about kissing toads to find your prince. I stamped and masked the frog and leaf and then created some water and sky with DIs - tumbled glass, shabby shutters and salty ocean. The 'water' had a stencil and peacock feathers added to it to give a sort of rippling effect. The main image was coloured with Coloursoft pencils and solvent. The stitched clouds are from a Sizzix landscape set and the reeds are by Craft Emotions cut from a scrap of card. I hand cut a gold crown and printed out the quotation. Now back to Christmas...

Sunday 22 November 2020

Festive Bauble


 Continuing with my Christmas cards I used this Sizzix die which I bought some months ago but hadn't used. I cut it from green card but decided the bird needed to be a contrasting colour so I used gold card for the bird and the two small pieces that made up the hanger. The blank space at the top of the bauble was crying out for a sentiment and this one by a company called Funstamps seemed to fit best. The card base was embossed with a snowflake folder and once the bauble was stuck down I added some candy cane Stickles to the berries and a small piece of wired ribbon.

Wednesday 18 November 2020

Walking in a Winter Wonderland


There's something about this card I find joyful - it makes me smile when I see it. I think it's the pop of red against the white and grey. The image is by Crafty Individuals, I've had my eye on it since it was launched so when I saw it for sale on eBay I decided to bid for it. I stamped it with Versafine Smokey Grey rather than harsh black - it adds to the faded vintage feel of the image. I made a batch of 12 of these stage by stage with the help of a stamping platform and some exact measuring (for a change). I cut out the card first (8 x 9.5cm) and with a few trial pieces positioned the stamp on the platform so that it fit on the card exactly. After that it was very fast to stamp each image out accurately.

I then used barn door DI with a waterbrush to paint the umbrellas. I wanted to replace the snow on the umbrella but neither a white gel pen nor a white Posca pen managed to give a pure white - both seemed to soak up the red ink and dried pink. Finally I achieved the result I wanted with white enamel accents. When dry I matted the stamped image with some red paper. The base card was embossed with the Sizzix falling snow embossing folder. The sentiment is a well-used stamp that I had made years ago. I debated stamping it in red but I didn't want it to detract from the focal red of the umbrella. I hope the card gives you Joy.

Monday 16 November 2020

Thursday 12 November 2020

Salvaging A Disaster


 Maybe repurposing would be a better word rather than salvaging. I attempted to make a card several weeks ago with blended DIs and stamping. It did not go well - the blending was very patchy and the card did not look the way I had envisaged in my head. It sat on my desk glaring at me for several weeks but it was something that couldn't be fixed so the next time I needed some card for diecutting I picked it up to use the blank reverse. The die I used was from a set of 2 I bought a few weeks ago at The Works. I cut it out and while poking the waste out, noticed how good the inked side looked. I think the inks were squeezed lemonade, peacock feathers and brushed corduroy DIs. I first used brushed corduroy on the diecut sentiment but it didn't have enough impact so I diecut the sentiment again with black card and stuck it on top to give a more stacked effect. This is what's left of the original card:


Monday 9 November 2020

New Stamps - Spring Flowers


I couldn't resist this big, bold tulip stamp when I saw it online and when it arrived I had to have a play. I stamped with Memento tuxedo black and coloured with alcohol markers. The sentiment is from another set that arrived at the same time.

The card below was stamped with Versafine onyx black and coloured with scribbled marker pens and a water brush. I was trying to recreate the look of Rembrandt tulips which are the multi-coloured ones. The sentiment, again from the new set was stamped with Versafine moss green. Did you know the variation in colour is the result of a virus that has been bred into them? OK no more virus talk!


Saturday 7 November 2020

Summer Lavender


Whilst I had the Katzelkraft stamp set out that I used in my previous post I stamped a few more images that reminded me of the warmth of summer. They were both coloured with scribbled marker pens and a waterbrush. The card above was stamped with Memento London fog and the stamped panel was mounted onto a card blank with foam pads. I added some tiny punched butterflies and some punched photo corners.


This was stamped with Versafine smoky gray, matted onto some patterned paper and stamped with a Paula Pascual sentiment.


Thursday 5 November 2020

Wishing You Joy


I am determined to only have happy posts on this blog during lockdown so let me start with this card - made just because - it makes me happy looking at it and I enjoyed the process of making it.

The trellis diecut is the same as in my previous card, in fact it was meant for the other card but I ended up ripping the front when I removed the tape holding the die in place so this is the reverse of that diecut. The watering can is a lovely image from an old Katzelkraft set (KTZ251-02) which I coloured in with watercolour pencils. The sentiment is a diecut and stamp by Simon Says Stamp inked with Wilted Violet DO. The yellow centres for the flowers were made with some very old (over 20 years I think) Tulip fabric paint. I thought yellow centres would finish off the flowers nicely but didn't know what to use. Whilst searching through my Posca Pens (I didn't have yellow anyway) I found some old Tulip paint bottles. I know I had gone through them years ago and thrown out the dried out ones so I was pleasantly surprised to find that this one worked perfectly - I'll have to give the others a try soon. So joyous wishes to everyone reading this.

Tuesday 3 November 2020

Quick and Easy...


Because I'm not feeling like doing anything too complicated. With lockdown 2.0 looming here in England and the weather getting steadily worse I feel it's going to be a long, bleak winter (sorry if you started  reading this to cheer yourself up). I debated whether to restart my Lockdown Cards series but decided against that. This is a speedy diecut only card for a friend. I used a bargain set of 2 inlay dies from The Works for the trellis effect and an Amazon die purchase for the sentiment. The paper is from the My Mind's Eye Adventure pad - bright, cheerful colours which make me feel a little brighter and more cheerful. Stay safe and well wherever you are.

Friday 23 October 2020

Flower Stamp Pocket Card


 Another pocket card for my Random Scraps Album using another of the scrapbook paper 'stamps'. The pink base card was left over from another project as was the brown card. I used a woodgrain embossing folder on the brown piece which was only just big enough. I added a tiny scrap of the Crafty Individuals paper and a couple of punched leaves. The retro flowers were punched out and a couple of gems were added.

Thursday 8 October 2020

Monthly Challenge - October


 This month's letter is:               

                                    N for Number

The only colour choice was Navy Blue (but I haven't used it).

I decided to give my Tim Holtz Umbrella Man an airing - I'd love to say it was because he has lots of numbers on him but that was pure coincidence. With the help of my stamping platform and Versafine onyx black I was able to stamp all the detail clearly. After masking the image I revived some excess ink (it may have been twisted citron Oxide) that was on my plastic mat with a few spritzes of water and ran the card through it. When dry I added a small flourish, another TH image, randomly over the card with pumice stone DI. This was followed by a couple of Paper Artsy number stamps with a Kaleidacolor ink pad and Versafine onyx black. Finally I filled in some gaps with a TH dot stencil and Impress poppy red. I removed the mask and added the text in Memory Box's Parker font.

Thursday 24 September 2020

Moonlit Dreams


This card is made with some very old stamps that I haven't used in a while and I had forgotten how much I liked the main image. It is by a now defunct American company called Innovative Stamp Creations and I remember I had first seen it on someone's blog and wanted to get my hands on it. 

This card uses masking for the moon (a punched circle) and the main image which was the first thing I stamped with Versafine onyx black. I used mowed lawn and blueprint sketch DIs for the background and then removed the masks. The leaves are by a UK company called Joroco and are even older than the main image. The sentiment is a small stamp I found in my 'words' drawer. I added a few coloured pencil highlights to the face.

Saturday 19 September 2020

Another Heart Pocket Card


 This pocket card uses scraps from the Pile of Shame (which is looking a little smaller). I can't remember what the terracotta base card was used for but a sizeable piece was on the Pile. I used a mosaic embossing folder and some leftover scraps from the Slanted Tri-fold Card here. I added another of the 'stamps' (you'll see a lot of those I have a pile of them) and some gems. The edges were shaded with tea dye DI and chalk.

Thursday 17 September 2020

Floral Pocket Card


 I watched a Jennifer McGuire tutorial on You Tube in which she revisited embossing folders - specifically the newer 3D folders. I have a couple so decided to try out the technique she demonstrated. I used a Crafter's Companion 3D folder called Country Garden on some patterned paper left over from the card I showed in my previous post. The circular sentiment is also a left over from that project from the same Kaisercraft stamp set. The idea is you ink one side of the embossing folder (depending on if you want the background or the raised pattern) and run the folder through your machine as normal. Because the 3D folders are deeply moulded you can ink the folder directly with the ink pad - in this case I used Impress peony purple. After embossing I used Impress cupid pink on a piece of cut and dry felt and rubbed it gently over the raised areas to highlight them. The sentiment was raised on foam pads.

Tuesday 15 September 2020

A Quick and Easy Smile


Sometimes you just need a quick card to send to someone 'just because...'. This came together in record time.

I die cut a fancy rectangle from patterned paper (Anna Marie Designs Blissful Peach) and used a handy Kaisercraft stamp set (Shine Bright) for all the other bits using circle punches. The circles were mounted on different sized foam pads to vary the height. That's it!

Saturday 12 September 2020

Heart Pocket Card

I haven't made a pocket card for a while - these are small cards (3" x 4") cut with a Sizzix die mostly made up of scraps from the Pile of Shame on my desk. They will be going into an album you can see here.

The background was a piece of card that I had heart embossed for another project but it hadn't looked right so it had been abandoned on my desk. I was using Brushos a few days later and had spritzed too much water and needed to blot some of it up so I grabbed the card, placed it over and was quite pleased with the results. The edges of the script patterned paper (not sure where it's from) were torn and I used a scrap of red card from the pile to die cut a TH scribbly heart. I'm happy with the way it's turned out and am enjoying putting these small cards together from bits and pieces - there's no pressure to make them or to fill the album -  I just have a look through the pile when I feel like it.

Thursday 10 September 2020

Masked Circle


I made a similar card a couple of months ago that you can see here . I still had the circle template so I blended 5 DOs and then overstamped with Woodware's Autumn Agapanthus. The sentiment is a magazine freebie. It's a simple card made easier if you have a stamping platform but effective.


Sunday 6 September 2020

Monthly Challenge - September


 This month the letter is:

O for Owl

Colour options are orange, olive and ochre and I managed to use all of them for once.

My biggest problem was how to shoehorn my newest toy - the wreath builder - onto the postcard. I knew which set I wanted to use, the Sizzix Autumn Owls stamp and die set. It has the excruciating sentiment 'Owl always love you' but I decided to avoid that. I used the smaller of the 2 owl stamps and stamped it first in Archival tangelo bright (orange) then sepia and then I cut out the owls leaving a small border. The background was made with smooshed crushed olive DI and Archival butterscotch (ochre-ish). I used the butterscotch with a Memory Box falling leaves stencil and then used the TH rays stencil with tea dye DI over both halves. I added some narrow washi tape where the 2 halves met. The 'leaves' were made from a Sizzix die and an X Cut feather die set. I added an eyelet? washer? (can't remember what they're called) to the centre. 

Wednesday 2 September 2020

More Wreath Building


More experiments with my new toy the wreath builder. This uses a rose layering set by Hampton Arts that I had pushed to one side because it is hard to align the layering stamps correctly. I've noticed that there are some demos on You Tube for this set so I'm going to have a look later. Anyway layering problems were irrelevant for this exercise as I was just making use of the individual shapes. I used a couple of the smaller more detail-enhancing layers of the set first in pink peony and then in magenta hue Archival ink. Finally I used one of the leaf detail stamps in Versafine spanish moss. I mounted this on some pink cardstock and a green square card blank. I used the southwestern corner punch on both layers and added some gems. I've left the card blank because I'm not sure what sentiment I will use but I think it will be a small thin sentiment laid across the centre rather than a circle as before.

 I'm happy with the look of this but would make the actual ring larger next time by positioning the stamps differently.


Saturday 29 August 2020

The Wreath Builder


 I've been spending (wasting) a lot of time on You Tube recently and one of the channels I've been watching has been Jennifer McGuire's. She has made a few videos using the Gina K wreath builder which is a template that you use with a stamping platform to help you place stamps to form a continuous circular(-ish) pattern. There are various instructions online to make your own template which I had a go at but then I saw something similar for sale on eBay and bought it. Below was my homemade attempt. As you can see it’s not perfect as the images are not equally aligned but it was enough to convince me that I would enjoy using this template.


The beauty of this is that you can use any stamps to build up a wreath shape and it is a great way of using up some of the smaller filler stamps you get in sets. I started with a floral themed one but any stamps can be used. I used some Altenew stamps from the beautiful day set with Impress spring green, Memento bamboo leaves and some Brilliance ink pads. I then added some tiny stamps from a couple of old Paula Pascual sets. When I'd finished stamping I coloured with alcohol markers and added some gems and glossy accents to the larger flower centres. The sentiment is from a Paula Pascual set stamped in Versafine spanish moss onto a diecut circle with a larger circle in orange underneath. I mounted this onto some diecut foam for extra dimension. The 4" square panel was matted onto some orange card with the corners punched out and then placed on a green square card blank.
I'm eager to try some more techniques with the wreath builder.


Saturday 22 August 2020

Word Girl

I stamped and coloured this image with alcohol markers some time ago and she has been sitting in the pile of shame on my desk peeping out at me every now and then and asking to be made up into a card. Her time finally came last night when she found herself some suitable companions in the pile.

The image is part of the WordGirl series by Star Trish Designs on Etsy and she is a good size for an A6 card. The scrap of patterned paper is from a Crafty Individuals pad and the papers are so lush I am reluctant to throw anything away. I didn't use the brighter red piece in the end but I cut a small part of the darker red card and embossed it with a bubble wrap embossing folder. I put the pieces together on a scrap of card smooshed with wilted violet, fossilized amber and twisted citron DOs. These were put onto a piece of plastic one at a time, sprayed with water and picked up on the card.

Here's the result:


Thursday 20 August 2020

Quick Congratulations


My son wanted a quick card to send to friends who have just discovered they are expecting a baby. I reached for this Crafter's Companion stamp & die set. It actually comes with a stamp and die of 2 champagne glasses for the centre but I didn't feel that was appropriate so I used an old teddy bear punch in (gender neutral) yellow. I also cut a matting circle in yellow. That's it - really quick and easy just the way I like it!

Thursday 13 August 2020

Monthly Challenge - August


I'm definitely in a cute frame of mind with this month's monthly challenge. The letter is

                                                             S for Summer

The colour options are scarlet, salmon and sepia.

I had a completely different idea for this - more vintage using a Crafty Individuals stamp with beach huts but I realised I'd not used this Sizzix/My Life Handmade die set called Great Outdoors. I've been reading a lot in the Press about staycations and camping and the caravan die in this set came to mind. All the die cuts came from this set including the 'hello' sentiment.

I watercoloured some stripes onto watercolour paper and then added the die cuts made mostly from scraps on my desk. I coloured the hearts and other bits with alcohol markers. The 'summer' text was stamped with some old peg alpha stamps onto patterned paper and then punched out with a small circle punch. I added Glossy Accents onto the letters for a little dimension. The windows and the hearts were given a coat of Wink of Stella for a little shimmer.

Sunday 9 August 2020

Die Cut Letters


 A few posts back I mentioned using papers that had gone wrong by die cutting letters. You can see the post here . I was playing with some Brushos, took the sprinkling and spritzing too far and ended up with this mess:

I decided to use it to try out a new die that had just arrived and if it was still a disaster it could then go in the bin. This was the result:


I diecut the words with the new die and stuck them to a piece of scrap card which I die cut with Tim Holtz's ornamental die. The little starburst shapes are a punch and I edged the die with Impress emerald ink. I outlined the lettering with a fine pen and mounted this onto an embossed piece of card that I had done for another project but not used. I could have stuck all this onto a plain white card blank but I decided it would tie everything together better if I had a small frame in green around the edge.This was achieved by using a blending sponge to add some Impress emerald . Few few pearl gems finished off the card.


Sunday 2 August 2020

Monthly Challenge - July


I'm a bit late with last month's alphabet challenge but the letter was that awkward one -

                                                                     X for Xenophile

The only colour available was Xanthic which is a bright yellow like mustard seed DI.
A Xenophile is the opposite of a Xenophobe so the theme was to depict an aspect of a country you love that is not your own.
One of the reasons I was so late was I couldn't decide which country to choose. I finally opted to use my Sizzix/Tim Holtz destination die because I love to travel. I adore visiting places with different cultures, sampling different foods, meeting different people and trying to learn a few words of a different language and at this moment in time I would gladly visit anywhere if I could.
I decided to get my Brushos out and made a background of violet, yellow, gamboge and scarlet. After cutting it I overstamped with a Paper Artsy text stamp and Versafine smokey grey. I used turquoise and white Brushos mixed with water to paint the base of the postcard and added some random stamps. A scrap of card was coloured with Impress cerulean blue and I die cut explore, adventure and discover from the Sizzix/Tim Holtz adventure words set for the background. The main words in white are from the same set. I added some photo corners punched from some of the waste card

Thursday 30 July 2020

Flower Pocket Cards


Continuing with small pocket cards (2" x 3") for my mini album of random things (aka using up some of the scraps and bits littering my desk). I used a Sizzix die set called flower cards which cut both the straight and curved corner cards and the flower pattern as well. The patterned paper was some old stuff that I played around with stencils and stamps on. Sometimes if there's a patterned paper you don't really like you can add stamps/ink/paint and die cut it to use it up. This also works with card that you've worked on past the point of looking good and just ended up with a mess - try using it to cut letters - it never looks as bad as you thought.
The words are from a Sizzix /Craft Asylum set. I added some small gems to the flower centres. I thought I'd place these cards on opposing pages on a DPS.

Monday 27 July 2020

Watercolour Pocket Card


This is the first pocket card I have made for the album in the previous post. It is 3" x 4" and I cut it from a Sizzix die set called flower cards.  I had a small piece of watercolour paper on which I had been playing with some watercolour paints.I mixed some watery pink and blue, splodged them on and spritzed with water to make the paints run further. When dry I stamped Crafty Individuals' script stamp and added some decorative tape (like washi but shiny) along the bottom. Over this I added a stamped strip and a postage stamp image which picked up on the blue of the watercolour. This 'stamp' is from a very old 12 x 12 sheet made up of small collaged images with a vintage feel which I cut apart with a pair of postage stamp edging scissors. I have a stack of these and I'm sure they will appear on a few more of these cards. I stuck a book page onto a scrap of card and used a Hero Arts stamp and cut set to make the butterflies which I shaded with  the residue of a pink and blue blending sponge. I added some pearls to the centres of the daisies.

Saturday 25 July 2020

Mini-Album of Random Stuff


I am not the tidiest of people - I hate throwing things out knowing that as soon as it's gone I will think of something amazing to do with it (never happens LOL!). With all the cardmaking that's been going on recently my desk has amassed quite a pile of half cut sheets of paper, unused diecuts etc etc. I decided to try and use the bits and make a mini-album of random things. I have a Sizzix die set that cuts 3" x 4" cards for pocket journalling so I thought this would be a good size to play around with. My aim is to use what I have and make a page or two whenever I feel like it. I haven't decorated the front yet or made a title but the covers are done and I  have cut some pages. The die set I used for the album is the Sizzix essential mini album by Lori Whitlock.
Here is the front cover:


This is the inside of the cover and first page:


The covers are made from the waste backing of a notepad and the patterned paper is cut from a Crafty Individuals 6 x 6 paper pad. Unfortunately it was a tiny bit short so I used a coordinating washi tape to fill the gap. The pages are cut from an old Papermania 12 x 12 set called A Hint of Pink. I remember how disappointed I was when I got it - the outside pic showed deep black papers but the actual papers were almost brown. They have barely been used so I thought this was a good opportunity to use some of them.
I've just held the album together with book rings for now but I may give it another binding later. I'm not in any rush to finish it and will add to it as and when I feel like it.


Related Posts Plugin for WordPress, Blogger...