My inky travels along life's rocky road
Showing posts with label Cards. Show all posts

Monday, 6 March 2023

Another Leaving Card

 Yet another card for someone who's leaving to start a business. I'm not sure what the business is so it's a general Good Luck card.


I made a background with alcohol inks - stream, sailboat blue, watermelon, silver and shell pink and used it to cut the base for the Sizzix TH butterflies and a rectangular frame. I die cut the detail on the butterflies in black card and stuck the 2 parts together along the bodies so that the detailed wings were raised. The text is a Sizzix die.


Wednesday, 1 March 2023

Dogs Rule!


This card is for a colleague who is leaving to start her own Dog Walking/Day Care business which has always been a dream of hers. I thought this Crafty Individuals stamp fitted the bill..

I stamped the image with Versafine onyx black and then masked the dogs in order to use a stencil for the background. The stencil is by Memory Box and I used crackling campfire, twisted citron and fossilized amber DOs.

The text is a Sizzix strip die called Hunky Dory. I coloured the collars and ID tags and used clear Nuvo drops on the eyes and the ID tags.

Saturday, 14 January 2023

Travel Birthday


 A card for a travel-loving friend. All the components came from a 12x12 paper pad I bought last year from The Works called 'Let the Adventure Begin'.

Wednesday, 11 January 2023

Quick Birthday Card


 I needed a quick birthday card and grabbed a die and some scraps of patterned paper that were lying on my desk. I die cut the sentiment from the same card as the base and also some blue patterned paper. I offset them slightly to give a shadow effect and used the same blue paper to punch out some starburst patterns for the background.

Sunday, 8 January 2023

Starry Birthday

As simple as this card looks it was quite fiddly to put together. The stars and the sentiment are all Sizzix dies but the star die is an inlay die that cuts into the card so the front is just a set of star-shaped holes and the blue stars are on the inside. I die cut the stars on the front of the card base and then did the same with some blue card making sure to keep all the tiny 'waste'. Then I stuck each blue star onto the inside through the relevant holes on the front. I'm not sure I would attempt that again! I've seen Jennifer McGuire do the same thing easily with some stuff called Press n' Seal but I didn't have any.
 

Friday, 16 September 2022

Contemporary Congratulations


It's that time of life when many of my son's friends are getting engaged and he wanted a couple of cards 'without hearts and stuff'. I had seen a card on Pinterest (or maybe someone's blog?), liked the CAS, contemporary style and had scribbled down a quick sketch on a scrap of paper. I forgot to jot down where I saw it but if I find it I will add a link.

I die cut a perforated rectangle, embossed it with an old Cuttlebug folder and added some fun foam behind it. The leaf die is from a Sizzix set - Spring Stems. I painted some Twinkling H2Os in majestic blue and mystic blue onto a scrap of watercolour paper, spritzed it with water to blend the two colours together and die cut the butterfly (I have no record of where this butterfly came from).

I wanted a sentiment in keeping with the clean style of the card and after a few attempts went for this small peel off. A few gems gave the card a subtle sparkle.

Thursday, 28 July 2022

All About the Die Cuts

When you need a card in a hurry die cuts can be invaluable.


I started with a Pretty Quick die called straight panel which cuts a complete A6 panel. I cut the panel in white card and then blended fossilised amber DO over it. It would have been even faster if I had cut the panel from coloured card. This was mounted on a white card blank. I die cut the sentiment and the butterfly from white card and added them. Job done!

Wednesday, 15 June 2022

Layered Stencil Birthday


 Another card using the hexagon layered stencils. This stencil is designed for square cards but my default card size is A6 so I'm left with a white border both sides to which I've added some thin strips of matching card. The colours used are Distress Oxide fossilized amber, twisted citron and wilted violet. The sentiment die is from Alina Crafts. I cut it twice from white and once from purple card, stacked the 2 white and offset the purple slightly on top. It helped make the sentiment stand out from the bold background.

Friday, 3 June 2022

Bright Daisies


 This is the Woodware stamp I bought at the Sandown Craft Show recently. I just wanted to stamp it out and see what it was like so I added some colouring with alcohol markers and some Glossy Accents to the centres. I managed to stick my finger into the central daisy before the Glossy Accents had dried so I stamped and cut another one out to add over the top.

Saturday, 14 May 2022

Layering Stencils - 2


 The second of my Nellie's Choice layering stencils is a floral one. I used DIs in evergreen bough, cracked pistachio and lucky clover for the 3 layers. These die cut flowers were sitting on my desk. I had coloured them with alcohol markers some time ago for a project which is only half-finished but they seemed to go well with the background. I added a silver embossed sentiment strip and mounted it on an A6 card blank.

Wednesday, 11 May 2022

Layering Stencils


 After over 2 years I finally made it to a Craft Show! How wonderful it was to see everything and be able to touch it instead of on a screen. Evidently there were many people who felt the same as I did because the show was packed. I had decided to leave it until the afternoon to visit when it tends to be quieter but it was very busy for the first half hour or so.

I was very mindful of what I bought - some white card from my usual supplier Lime Tree Crafts, some white and silver Nuvo Drops, a Woodware flower stamp that I've seen Natasha Foote use and 2 sets of background layering stencils. Of course I had to try out the stencils straight away and made a quick card with the Honeycomb set.

I used Distress Oxides in spiced marmalade, crackling campfire and candied apple and added some gold peel-off strips to the left and right. The sentiment is gold embossed from a sentiment stamp and die set and I mounted it on foam tape. That's it really!

Saturday, 7 May 2022

Quadrilaterals


 This card uses a sketch I saw on Robin Armbrecht's YouTube channel here. She uses 6x6 patterned papers cut into quadrilaterals to make a set of cards. I used some patterned paper that I think was from a magazine freebie and some pink card that I embossed with a Cuttlebug folder.

It's a great idea for batch-making cards and using up odd sheets of 6x6 paper.

Saturday, 19 March 2022

Sunflower


 I'm not sure I've blogged this stamp before although I've had it for a while. The set has a very big sunflower image and some useful sentiments, one of which I used in my previous post below. I heat embossed the image in gold and then used mustard seed, wild honey and peeled paint DIs with foam blending pads. The sentiment is from a stamp and die set of sentiments which I raised on foam pads.

Saturday, 26 February 2022

Another Shaker Card


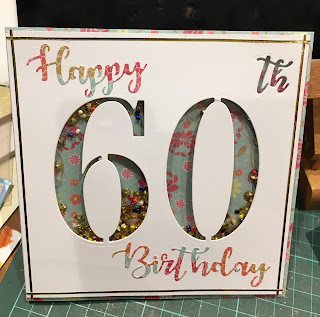
 I decided to have another try at a shaker card using the Crafter's Companion cut-in numbers. The balloons are a Sizzix die and the stamped text is from a Winnie & Walter set. I was more successful with the sequins and beads but I think I have too many this time.

Thursday, 24 February 2022

Meadow Wreath


 This is a card I made from the Crafter's Companion Meadow Wreath turnabout stamp. It was stamped with Versafine inks in crimson red, imperial purple, majestic blue & spanish moss. I mounted the 14cm square onto a 15cm square ochre card blank. I die cut a circle from white card and added a Crafter's Companion die cut sentiment in ochre.

Saturday, 5 February 2022

A Quick Card


 Sometimes you just need a quick card so made this lattice-stencilled background with Memento toffee crunch and added a die-cut sentiment with a couple of card strips top and bottom.

Thursday, 3 February 2022

My First Shaker


A significant birthday seemed the ideal time to use the Crafter's Companion Cut-in Numbers and Cut-in Sentiments sets that I purchased recently. The numbers are very big so I kept the rest of the card clean and simple.

The patterned paper is from My Mind's Eye and I used it to cover the front of a 14.5cm square card blank. I die cut the numbers and the 'th' (called an ordinal) from a 14cm square piece of card, covered the back with acetate and put foam tape around the cut numbers and the edges of the card blank.

I dabbed powder around the edges of the tape to prevent the sequins from sticking to the sides but I don't think I added enough as some sequins did get stuck. I used a combination of sequins and seed beads and bunched them up onto the patterned paper and then placed the cut card on top. Next time I might try to do it the other way around, placing the sequins in the 'well' and placing the card blank over it. I think I should have used more sequins as well but you live and learn.

I used some old peel-off strips to form a border around the front and die cut the sentiment from the Cut-in Sentiments set in a coordinating paper from the same pad.

I'm very pleased with this bundle of dies and think it will be very useful for a variety of occasions.

Friday, 21 January 2022

Inspired by . . . Natasha


 Although it's been pretty quiet on the blog I have been busy crafting but the cards are of a style I've shown before (several new baby cards). I've also been watching a lot of You Tube tutorials. Someone I watch often is Natasha Foote who posts a video almost every day. I like the fact that she's not always pushing the latest stamps etc but has a small edit of items that she uses in different ways and encourages us to use what we have. It was this video that prompted the card above. I decided to use one of the rotation stamp backgrounds I made here.

Natasha tends to use US card sizes whilst I prefer a standard UK A6 for my cards so I had to tweak the measurements a little but I followed the same principles. I matted the pieces on a sliver of black card and as the background was so busy I went for a black die cut - Frangia Bouquet by Memory Box. The sentiment is from a stamp and die set that cuts several small sentiment strips in one go.

Saturday, 8 January 2022

Spots and Dots


I used one of the backgrounds I made here to make a couple of quick cards that I needed in a hurry. The first uses a layered sentiment die.

As the backgrounds are square, I was left with a spare strip that I made into another card with a sentiment from the caring thoughts set by Creative Crafts.


Friday, 24 December 2021

Christmas Snow Globe


 I'm all for quick and simple card making so I don't know what I was thinking when I bought this Sizzix bell jar diorama die set in a sale in the summer (OK maybe I was thinking ooh bargain!). When I actually opened the packet up last month to make some cards I was met with an assortment of tiny dies and it took a while (and some online assistance) to figure out what went where.
After that it was a question of trying to figure out what card to use for which bit and cutting it all out. I found it easiest to batch cut in 4s or 6s and then store the bits carefully. Then I assembled parts like the trees, the houses etc before finally assembling each one. Along the way I found it easiest to cut some of the tiniest bits (windows, wreaths, bows, snow in white card and colour as necessary with alcohol markers. Similarly I used a single brown card and coloured some parts with a darker brown marker. 
I'm pleased with the final result but boy was it fiddly! I used grey card for the outline, some patterned blue paper for the sky, dark green for the trees, brown for the trunks, house, base and path and glitter silver card for the stars. The rest was all coloured with markers. The sentiment is an old stamp I had made many years ago. 
Nothing left but for me to wish you all a very happy Christmas. May you stay safe and well.
Related Posts Plugin for WordPress, Blogger...